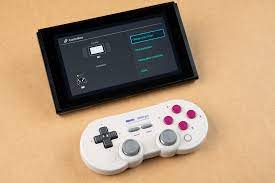
8bitdo sn30 pro how to connect to switch, To connect your 8BitDo SN30 Pro controller to your Nintendo Switch, you can follow these steps:
8bitdo sn30 pro how to connect to switch:
1. Ensure Your Controller is Charged: Before you start, make sure your SN30 Pro controller has enough battery power to pair with your Nintendo Switch.
2. Turn on Your Nintendo Switch:
- If your Switch is in docked mode, remove the Joy-Cons from the sides of the Switch console.
- If your Switch is in handheld mode, open the kickstand at the back of the console.
3. Turn on the SN30 Pro Controller:
- Press and hold the Start button on the controller for a few seconds until the LED lights start flashing. This indicates the controller is in pairing mode.
4. Pairing with Nintendo Switch:
- On the Nintendo Switch home screen, go to “System Settings” (the gear icon).
- Select “Controllers and Sensors” from the menu on the left.
5. Choose “Change Grip/Order”:
- In the Controllers and Sensors menu, select “Change Grip/Order.”
6. Press the Sync Button on the Controller:
- On the bottom of your SN30 Pro controller, there is a small sync button. Press it.
7. Wait for the Connection:
- The LED lights on the controller will blink, and the controller will try to establish a connection with the Nintendo Switch. Once it successfully connects, one of the LED lights will become solid, indicating the controller is paired with the Switch.
8. Test the Controller:
- Verify that the controller is working correctly by navigating the Switch menu and trying out some games.
Please note that the process might vary slightly depending on the firmware version of your SN30 Pro controller. If you encounter any issues, it’s a good idea to check the 8BitDo website or the controller’s manual for specific instructions related to your firmware version.
How do I use 8Bitdo Pro on switch?
To use the 8BitDo SN30 Pro controller on your Nintendo Switch, you can follow these steps:
1. Ensure Compatibility:
- Make sure your 8BitDo SN30 Pro controller is compatible with the Nintendo Switch. The SN30 Pro is designed to work with the Switch and other platforms, so it should be compatible.
2. Charge Your Controller:
- Ensure that your SN30 Pro controller has enough battery charge to be used.
3. Update Firmware (if necessary):
- Before using the controller, it’s a good practice to check if there are any firmware updates available for your SN30 Pro. You can visit the official 8BitDo website and download the latest firmware if needed.
4. Power On Your Nintendo Switch:
- If your Switch is in docked mode, remove the Joy-Cons from the sides of the console. If it’s in handheld mode, open the kickstand at the back of the console.
5. Power On the SN30 Pro Controller:
- Press and hold the Start button on the SN30 Pro controller until the LED lights start flashing. This indicates that the controller is in pairing mode.
6. Pair the Controller with the Switch:
- On your Nintendo Switch, go to “System Settings” (the gear icon) from the home screen.
- Select “Controllers and Sensors” from the menu on the left.
- Choose “Change Grip/Order.”
7. Press the Sync Button on the Controller:
- On the bottom of your SN30 Pro controller, there is a small sync button. Press it.
8. Wait for Connection:
- The LED lights on the controller will blink, indicating that it’s trying to establish a connection with the Nintendo Switch. Once it successfully connects, one of the LED lights will become solid, indicating that the controller is paired with the Switch.
9. Test Your Controller:
- Verify that the controller is working correctly by navigating the Switch menu and trying out some games.
Once you’ve completed these steps, your 8BitDo SN30 Pro controller should be successfully paired with your Nintendo Switch and ready to use for gaming. Remember that some games might require specific button configurations, so you may need to adjust the controller settings within individual games if necessary.
How do I connect my 8Bitdo Ultimate controller to my switch?
To connect your 8BitDo Ultimate controller to your Nintendo Switch, follow these steps:
1. Power On Your Nintendo Switch:
- If your Switch is in docked mode, remove the Joy-Cons from the sides of the console. If it’s in handheld mode, open the kickstand at the back of the console.
2. Power On the 8BitDo Ultimate Controller:
- Press and hold the Start button on the 8BitDo Ultimate controller until the LED lights start flashing. This indicates that the controller is in pairing mode.
3. Pair the Controller with the Switch:
- On your Nintendo Switch, go to “System Settings” (the gear icon) from the home screen.
- Select “Controllers and Sensors” from the menu on the left.
- Choose “Change Grip/Order.”
4. Press the Sync Button on the Controller:
- On the bottom of your Ultimate controller, there is a small sync button. Press it.
5. Wait for Connection:
- The LED lights on the controller will blink, indicating that it’s trying to establish a connection with the Nintendo Switch. Once it successfully connects, one of the LED lights will become solid, indicating that the controller is paired with the Switch.
6. Test Your Controller:
- Verify that the controller is working correctly by navigating the Switch menu and trying out some games.
If the above steps do not work or if you encounter issues, here are a few additional troubleshooting tips:
- Update Firmware: Make sure your Ultimate controller has the latest firmware. You can download firmware updates from the official 8BitDo website.
- Check Compatibility: Ensure that the Ultimate controller model you have is compatible with the Nintendo Switch. Some 8BitDo controllers are designed for specific platforms, so verify the compatibility of your controller with the Switch.
- Restart Your Switch: Sometimes, simply restarting your Nintendo Switch can resolve connectivity issues.
By following these steps and considering the troubleshooting tips, you should be able to successfully connect your 8BitDo Ultimate controller to your Nintendo Switch.
How do I connect my pro controller to my switch?
Connecting your Nintendo Switch Pro Controller to your Switch console is straightforward. Here’s how you can do it:
1. Power On Your Nintendo Switch:
- If your Switch is in docked mode, remove the Joy-Cons from the sides of the console. If it’s in handheld mode, open the kickstand at the back of the console.
2. Power On Your Pro Controller:
- Press and hold the small circular button located on the top edge of the Pro Controller, near the USB-C charging port. The lights around the Home button will flash to indicate it’s in pairing mode.
3. Pair the Controller with the Switch:
- On your Nintendo Switch, go to “System Settings” (the gear icon) from the home screen.
- Select “Controllers and Sensors” from the menu on the left.
- Choose “Change Grip/Order.”
4. Press the Sync Button on the Controller:
- On the bottom of your Pro Controller, there is a small sync button. Press it.
5. Wait for Connection:
- The lights around the Home button on your Pro Controller will flash while it’s searching for a device to pair with. Once the connection is established, one light will become solid, indicating that the controller is paired with the Switch.
6. Test Your Controller:
- Verify that the controller is working correctly by navigating the Switch menu and trying out some games.
Your Nintendo Switch Pro Controller is now connected and ready to use with your Nintendo Switch console. Remember, this process should also work if you need to reconnect the controller in the future or connect it to a different Switch console.
How do I connect my Bluetooth controller to my switch?
As of my last update in September 2021, Nintendo Switch consoles do not natively support Bluetooth connections for third-party controllers. This means you cannot directly connect a Bluetooth controller to the Switch without using additional accessories or adapters.
However, if you want to use a Bluetooth controller with your Switch, you can consider using a Bluetooth adapter. Here’s how you can do it:
Using a Bluetooth Adapter:
- Purchase a Bluetooth Adapter: Buy a Bluetooth adapter that is compatible with the Nintendo Switch. There are various adapters available that allow you to connect Bluetooth devices to the Switch via USB.
- Plug In the Bluetooth Adapter: Plug the Bluetooth adapter into one of the USB ports on your Nintendo Switch dock.
- Pair Your Bluetooth Controller: Put your Bluetooth controller into pairing mode. Refer to the controller’s manual for instructions on how to do this.
- Pair the Controller with the Bluetooth Adapter: Follow the adapter’s instructions to pair your Bluetooth controller with the adapter.
- Configure Controller Settings (If Necessary): Some adapters might require additional configuration or software installation. Follow the provided instructions to set up your controller properly.
Please note that the availability and compatibility of Bluetooth adapters may have changed since my last update in September 2021. Therefore, it’s essential to check the latest products and user reviews to ensure you’re purchasing a reliable and compatible Bluetooth adapter for your Nintendo Switch.
Always follow the specific instructions provided with the Bluetooth adapter and your controller for the best results.
More story in Hindi to read:
Moral stories in Hindi for class