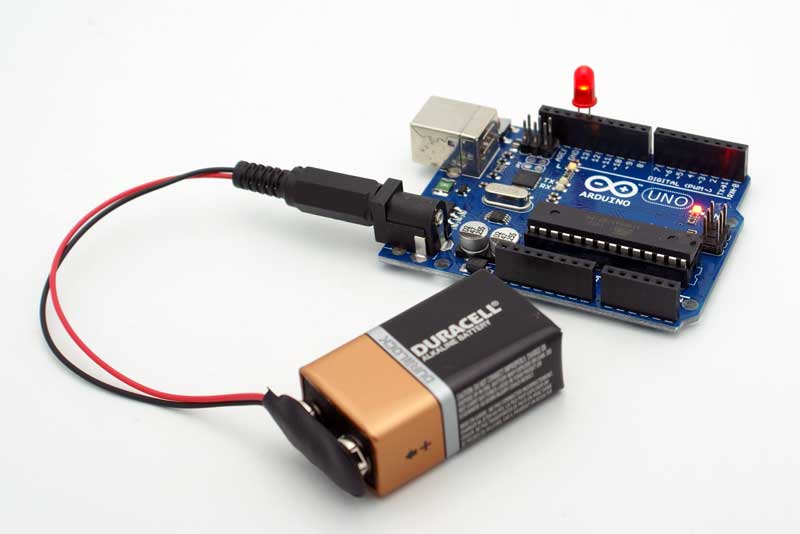
How to connect 9v battery to arduino , To connect a 9V battery to an Arduino, you can follow these steps:
Materials you’ll need:
How to connect 9v battery to arduino :
- Arduino board (e.g., Arduino Uno)
- 9V battery
- Battery clip with a connector (usually a 9V battery connector)
- Jumper wires
- Breadboard (optional, but can be useful for making connections)
Steps:
- Prepare the Battery Clip:
- Start by identifying the positive (+) and negative (-) terminals on the battery clip. The battery clip should have a red wire for the positive terminal and a black or brown wire for the negative terminal.
- If the battery clip is not pre-soldered to the battery connector, you may need to solder it in place. Be sure to connect the red wire to the positive terminal and the black/brown wire to the negative terminal.
- Connect the Battery Clip to the Arduino:
- Locate the Arduino’s power connector, which is typically a black rectangular connector near the edge of the board labeled “PWR IN” or something similar.
- Connect the red wire (positive) from the battery clip to the VIN (Voltage In) pin on the Arduino. This pin is usually located near the power connector.
- Connect the black/brown wire (negative) from the battery clip to the GND (Ground) pin on the Arduino.
- Power Selector Jumper (if needed):
- Some Arduino boards have a power selector jumper that allows you to choose between powering the board from the USB connection or an external source (like the 9V battery). If your Arduino has this jumper, ensure it’s set to the external source (usually labeled “EXT” or “VIN”).
- Connect Components to the Arduino:
- Now that the Arduino is powered by the 9V battery, you can connect your components (sensors, LEDs, etc.) to the appropriate pins on the Arduino. Make sure to connect any components according to your project’s requirements.
- Upload Your Code:
- Connect your Arduino board to your computer using a USB cable.
- Open the Arduino IDE on your computer and write or load the Arduino sketch (code) you want to run on your board.
- Click the “Upload” button to upload the code to the Arduino. The Arduino will run your code using power from the 9V battery.
By following these steps, you should be able to power your Arduino board with a 9V battery. Remember that the 9V battery will eventually run out of power, so you may need to replace it or recharge it depending on the type of battery you’re using. Additionally, consider using a voltage regulator if you need a stable voltage supply, as 9V batteries can have some voltage fluctuations as they discharge..
Can I use a 9V battery on a 5V Arduino?
Using a 9V battery with a 5V Arduino is possible, but it requires some additional components to regulate the voltage because the Arduino operates at 5V. Simply connecting a 9V battery directly to a 5V Arduino will likely damage the board because the voltage is too high.
To safely power a 5V Arduino with a 9V battery, you can use a voltage regulator. Here’s how you can do it:
Materials you’ll need:
- 5V Arduino board (e.g., Arduino Uno)
- 9V battery
- Battery clip with a connector (usually a 9V battery connector)
- Voltage regulator (e.g., LM7805 or a similar regulator)
- Capacitors (1uF and 0.1uF)
- Heat sink for the voltage regulator (recommended for extended use)
Steps:
- Prepare the Battery Clip:
- As mentioned in the previous answer, identify the positive (+) and negative (-) terminals on the battery clip. The red wire is usually for the positive terminal, and the black or brown wire is for the negative terminal.
- Connect the Battery Clip to the Voltage Regulator:
- Connect the red wire (positive) from the battery clip to the input (VIN) of the voltage regulator.
- Connect the black/brown wire (negative) from the battery clip to the ground (GND) of the voltage regulator.
- Connect the Voltage Regulator to the Arduino:
- Connect the output (VOUT) of the voltage regulator to the 5V pin on the Arduino.
- Connect the ground (GND) of the voltage regulator to the GND pin on the Arduino.
- Add Capacitors (Optional but recommended):
- Connect a 1uF capacitor between the input (VIN) and ground (GND) of the voltage regulator to help stabilize the input voltage.
- Connect a 0.1uF capacitor between the output (VOUT) and ground (GND) of the voltage regulator to filter out any noise.
- Attach a Heat Sink (Recommended):
- If you plan to use the voltage regulator for an extended period and it gets hot, consider attaching a heat sink to the regulator to dissipate heat and prevent overheating.
- Power on the Arduino:
- With these connections in place, you can now power on the Arduino by connecting the battery to the battery clip. The voltage regulator will ensure that the voltage supplied to the Arduino is a safe and stable 5V.
By following these steps and using a voltage regulator, you can safely power a 5V Arduino with a 9V battery. This setup allows you to run your Arduino projects using a portable power source while maintaining the correct voltage levels for your board.
How to connect battery to power Arduino?
To power an Arduino board using a battery, you can follow these steps. The specific type of battery and connection method will depend on your project’s requirements, but here’s a general guide:
Materials you’ll need:
- Arduino board (e.g., Arduino Uno)
- Battery appropriate for your project (e.g., 9V battery, AA or AAA batteries, LiPo battery, etc.)
- Battery holder or connector suitable for your battery type
- Jumper wires
- Voltage regulator (if needed to adjust voltage)
Steps:
- Determine Your Battery Type:
- Choose the appropriate battery type for your project based on your power requirements, desired runtime, and voltage compatibility with your Arduino board. Common options include 9V batteries, AA or AAA batteries, and rechargeable LiPo batteries.
- Prepare the Battery Holder or Connector:
- If your battery has a compatible connector or holder, you can skip this step. Otherwise, you may need to solder wires or connectors to the battery terminals.
- Voltage Regulation (if needed):
- Some Arduino boards can tolerate a range of input voltages, but others require a steady voltage source. If your battery voltage is higher than what the Arduino can handle (e.g., 9V for a 5V Arduino), you may need a voltage regulator to step down the voltage to the appropriate level. Connect the voltage regulator as described in the previous response.
- Connect the Battery to the Arduino:
- Connect the positive (+) terminal of your battery or battery holder to the VIN (Voltage In) pin on the Arduino. This is where the power will enter the Arduino.
- Connect the negative (-) terminal of your battery to the GND (Ground) pin on the Arduino to complete the circuit.
- Power Selector Jumper (if needed):
- As mentioned in the previous response, some Arduino boards have a power selector jumper that lets you choose between powering the board from the USB connection or an external source. Ensure it’s set to the external source (usually labeled “EXT” or “VIN”) if your board has this feature.
- Upload Your Code:
- Connect your Arduino board to your computer using a USB cable.
- Open the Arduino IDE on your computer and write or load the Arduino sketch (code) you want to run on your board.
- Click the “Upload” button to upload the code to the Arduino. The Arduino will run your code using power from the battery.
- Test and Monitor:
- Ensure that your project is working as expected while powered by the battery. Depending on the battery type and capacity, you may need to monitor the battery’s voltage and replace or recharge it when it gets low.
By following these steps, you can successfully power your Arduino board using a battery, making your project portable and independent of a fixed power source. Be mindful of your battery’s capacity and the power consumption of your project to ensure it runs for the desired duration.
Can I power Arduino with phone charger?
Yes, you can power an Arduino board using a phone charger, but you need to be cautious about the voltage and current rating of the charger. Here’s how to do it:
Materials you’ll need:
- Arduino board (e.g., Arduino Uno)
- USB phone charger (with a USB-A output)
- USB cable (with a USB-A connector on one end and the appropriate connector for your Arduino board on the other end)
Steps:
- Check Voltage and Current:
- Examine your phone charger to determine its output voltage and current rating. Most phone chargers provide 5V output, which is compatible with Arduino boards. The current rating should be sufficient to power your Arduino and any connected components.
- Connect the USB Cable:
- Plug one end of the USB cable into the USB-A port on the phone charger.
- Connect the Arduino:
- Plug the other end of the USB cable into the USB port on your Arduino board. This is typically the same port you use to connect your Arduino to your computer for programming.
- Power on the Arduino:
- Once the USB cable is connected, the Arduino should receive power from the phone charger. You can check if it’s powered by observing the onboard LED (usually marked “ON”) or running your Arduino sketch to see if it functions as expected.
Using a phone charger is a convenient way to power your Arduino, especially when you need a stable 5V power source. However, keep the following considerations in mind:
- Make sure the charger provides a stable 5V output. Some low-quality chargers may have voltage fluctuations or excessive noise, which could affect your Arduino’s performance.
- Check the current rating of the charger. If your project and connected components draw more current than the charger can supply, you risk overheating the charger, voltage drops, or even damaging the charger and your Arduino.
- While this method is suitable for many Arduino projects, it’s not suitable for portable or battery-operated applications unless you plan to use a USB power bank as the power source.
- Always make sure the USB cable is in good condition and properly connected to avoid power interruptions.
In most cases, using a standard USB phone charger is a practical and reliable way to power your Arduino board when you have access to an electrical outlet.
How much voltage is required for Arduino?
Arduino boards typically require a voltage of 5 volts (5V) to operate properly. This voltage is used to power the board and its components. Here are some key points related to the voltage requirements of Arduino:
- Operating Voltage: Most Arduino boards, such as the Arduino Uno, Arduino Nano, and Arduino Mega, are designed to operate at 5V. They have built-in voltage regulators to provide a stable 5V supply to the board.
- Input Voltage Range: Arduino boards often have a specified input voltage range that allows them to be powered by a variety of sources. For example, the Arduino Uno can be powered with an input voltage between 7V and 12V via its external power jack. This range allows for flexibility in choosing a power source.
- USB Power: When you connect an Arduino board to your computer via USB, it receives power from the USB connection, which is typically 5V. This is sufficient for most projects, and it’s a convenient way to power and program the board.
- Battery Power: If you want to power an Arduino board with a battery, you may need to use a voltage regulator or a battery with a voltage within the Arduino’s specified input voltage range. For example, a 9V battery can be used with a voltage regulator to supply 5V to an Arduino.
- External Power Supplies: Besides USB and batteries, you can also use external power supplies or adapters that provide a stable 5V output to power your Arduino.
It’s important to check the specific voltage requirements of your Arduino board, as there are some variations among different Arduino models. Additionally, some specialized Arduino variants, such as the Arduino Pro Mini or Arduino Lilypad, may have different voltage requirements, so always refer to the documentation for your specific board.
Using the correct voltage is crucial to prevent damage to your Arduino board and ensure the proper functioning of your projects.
More story in Hindi to read:
Moral stories in Hindi for class