How to connect hc-05 to android, Connecting an HC-05 Bluetooth module to an Android device involves a few steps. The HC-05 is a popular Bluetooth module that allows wireless communication between devices. Here’s a general guide on how to connect an HC-05 to an Android device:
How to connect hc-05 to android:
Hardware Setup:
- Power Supply:
- Connect the VCC pin of the HC-05 to a 5V power source.
- Connect GND to the ground.
- Serial Communication:
- Connect the TX pin of the HC-05 to the RX pin of your microcontroller or USB-to-Serial adapter.
- Connect the RX pin of the HC-05 to the TX pin of your microcontroller or USB-to-Serial adapter.
- Mode Configuration (optional):
- Some HC-05 modules have a key pin that you might need to toggle between AT mode and communication mode. Check the datasheet for details.
Software Setup:
- Install a Terminal Emulator App:
- Download and install a terminal emulator app on your Android device. Termux is a popular choice, but any terminal app with Bluetooth support will work.
- Pairing:
- Turn on Bluetooth on your Android device.
- Put the HC-05 into pairing mode. This is usually done by holding the button on the module until the LED starts blinking rapidly.
- On your Android device, go to Bluetooth settings and pair with the HC-05. The default Bluetooth passcode for the HC-05 is often ‘1234’ or ‘0000’.
- Open Terminal Emulator:
- Open the terminal emulator app on your Android device.
- AT Commands:
- If you want to configure the HC-05 or check its settings, you can use AT commands. Type
ATin the terminal and press Enter. You should receive an OK response if the connection is successful.
AT- You can explore various AT commands to set the module in different modes, change the Bluetooth name, PIN, etc. Refer to the HC-05 datasheet for a list of AT commands.
- If you want to configure the HC-05 or check its settings, you can use AT commands. Type
Example AT Commands:
- To change the Bluetooth name:plaintextCopy code
AT+NAME=new_name - To change the PIN:plaintextCopy code
AT+PIN=1234
Remember that the exact commands may vary depending on the firmware version of your HC-05 module. Consult the HC-05 datasheet or user manual for accurate information.
After setting up the HC-05 and configuring it as needed, you can use it for wireless communication between your Android device and other devices, such as microcontrollers or Arduino boards.
How do I connect to HC-05?
To connect to an HC-05 Bluetooth module from an Android device, you can use Bluetooth communication. Below are the general steps to connect an Android device to an HC-05 module:
Pairing the Devices:
- Turn on Bluetooth on Android:
- Open the settings on your Android device.
- Navigate to the “Bluetooth” settings and turn it on.
- Put HC-05 in Pairing Mode:
- Make sure the HC-05 module is powered on.
- If your HC-05 module has a button, press and hold it until the LED starts blinking rapidly. This usually indicates that the HC-05 is in pairing mode.
- If your HC-05 requires a passcode during pairing, the default is often ‘1234’ or ‘0000’.
- Pair Devices:
- On your Android device, go back to the Bluetooth settings.
- Scan for available devices. The HC-05 should appear in the list of available devices.
- Select the HC-05 from the list to initiate the pairing process.
- If a passcode is required, enter the default passcode.
- Connection Status:
- Once paired, the Bluetooth settings on your Android device should indicate that the HC-05 is connected.
Using Bluetooth for Communication:
After pairing, you can use Bluetooth communication to exchange data between the Android device and the HC-05 module. Here’s a basic example using Android Bluetooth API (assuming you are developing an Android app):
javaCopy code
import android.bluetooth.BluetoothAdapter; import android.bluetooth.BluetoothDevice; import android.bluetooth.BluetoothSocket; import java.io.IOException; import java.util.UUID; public class BluetoothConnection { private BluetoothAdapter bluetoothAdapter; private BluetoothSocket socket; private static final UUID MY_UUID = UUID.fromString("00001101-0000-1000-8000-00805F9B34FB"); public BluetoothConnection() { bluetoothAdapter = BluetoothAdapter.getDefaultAdapter(); } public void connectToDevice(String deviceAddress) { BluetoothDevice device = bluetoothAdapter.getRemoteDevice(deviceAddress); try { socket = device.createRfcommSocketToServiceRecord(MY_UUID); socket.connect(); // Now, you can use 'socket' for communication. } catch (IOException e) { // Handle connection errors e.printStackTrace(); } } public void closeConnection() { try { socket.close(); } catch (IOException e) { // Handle closure errors e.printStackTrace(); } } }
Remember to request the necessary Bluetooth permissions in your AndroidManifest.xml file and handle the Bluetooth runtime permissions in your code.
Please adapt the above code to suit your specific application requirements. This is a basic example, and you might need additional error handling, background threads, or other features depending on your use case.
How to connect Arduino Bluetooth module to Android?
To connect an Arduino Bluetooth module (such as the HC-05 or HC-06) to an Android device, you’ll need to follow a few steps. Below is a general guide to establish a Bluetooth connection between an Arduino and an Android device:
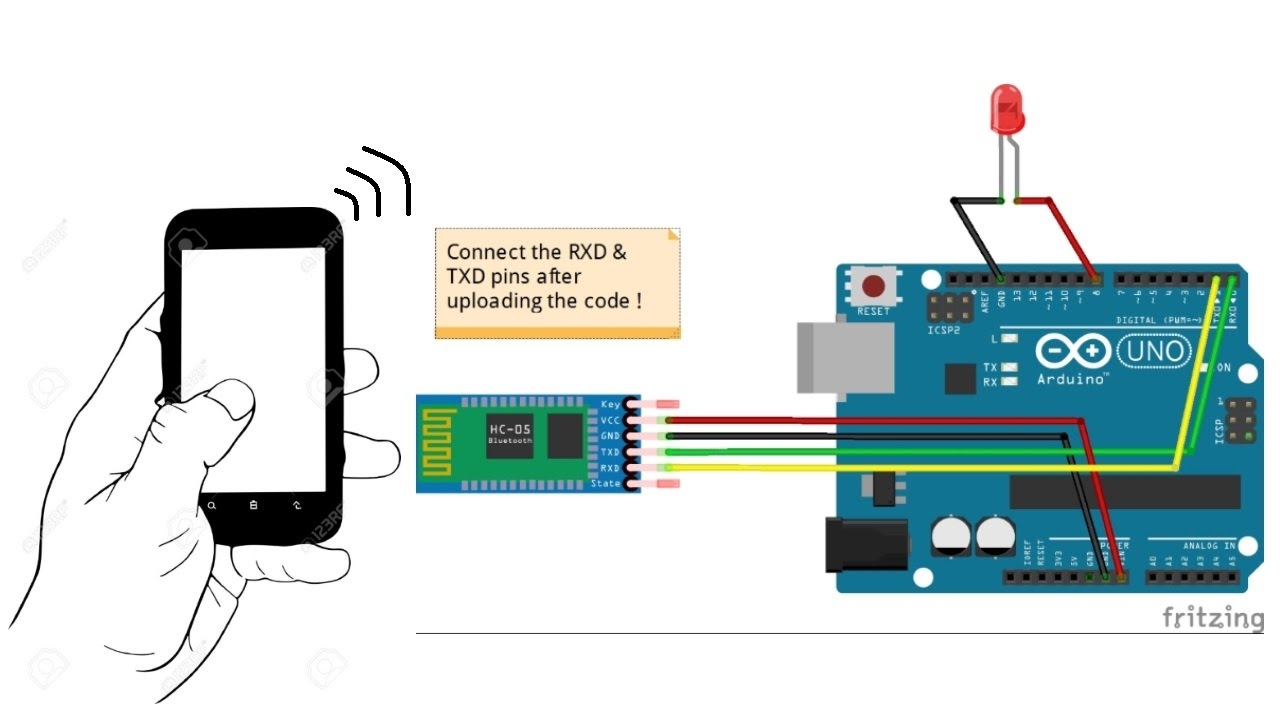
Hardware Setup:
- Connect Bluetooth Module to Arduino:
- Connect the VCC pin of the Bluetooth module to the 5V output on the Arduino.
- Connect the GND pin of the Bluetooth module to the GND on the Arduino.
- Connect the TX pin of the Bluetooth module to the RX pin on the Arduino.
- Connect the RX pin of the Bluetooth module to the TX pin on the Arduino.
- Power Up the Arduino:
- Power up your Arduino board, either through USB or an external power source.
Software Setup:
- Install Arduino IDE:
- Install the Arduino IDE on your computer if you haven’t already.
- Install Required Libraries:
- If you are using a specific library for Bluetooth communication (e.g., SoftwareSerial or AltSoftSerial), make sure to install it using the Arduino Library Manager.
- Upload Arduino Sketch:
- Write an Arduino sketch (program) that initializes the Bluetooth module, sets up the serial communication, and handles data transmission.
#includeSoftwareSerial bluetoothSerial(2, 3); // RX, TX pins on Arduino void setup() { Serial.begin(9600); bluetoothSerial.begin(9600); // Bluetooth module baud rate } void loop() { if (bluetoothSerial.available()) { char data = bluetoothSerial.read(); Serial.print(data); // Output received data to Serial Monitor } // Add your Arduino code here } - Modify the sketch according to your needs, and upload it to your Arduino board.
- Pair Android Device with Arduino:
- Turn on Bluetooth on your Android device.
- Put the Bluetooth module on the Arduino into pairing mode (refer to the module’s documentation).
- Pair the Android device with the Bluetooth module. The default PIN might be ‘1234’ or ‘0000’.
- Create Android App:
- Develop an Android app that communicates with the Arduino using Bluetooth. You can use Android Studio for app development.
- Android Bluetooth Code:
- Implement Bluetooth communication in your Android app using the Android Bluetooth API. Connect to the Bluetooth module on your Arduino by its MAC address.
// Example Android code to connect to a Bluetooth device BluetoothAdapter bluetoothAdapter = BluetoothAdapter.getDefaultAdapter(); BluetoothDevice device = bluetoothAdapter.getRemoteDevice("00:21:13:01:2B:44"); // Replace with your Arduino's MAC address BluetoothSocket socket = device.createRfcommSocketToServiceRecord(UUID.fromString("00001101-0000-1000-8000-00805F9B34FB")); // Now, use 'socket' for communication with the Arduino.- Handle Bluetooth permissions in your AndroidManifest.xml file.
Remember to replace the Bluetooth module’s MAC address in the Android code with the correct address for your Arduino Bluetooth module.
This is a basic setup, and you may need to adapt the code based on your specific requirements and hardware configuration.
What is the code for HC-05 Bluetooth?
The code for using an HC-05 Bluetooth module with an Arduino typically involves initializing the module and setting up serial communication. Here’s a basic example of Arduino code that demonstrates how to send and receive data via Bluetooth using an HC-05 module:
cppCopy code
#include
This code uses the SoftwareSerial library to create a software serial port on pins 2 and 3, which are used to communicate with the RX and TX pins of the HC-05 module. The bluetoothSerial object is then used to send and receive data over Bluetooth.
Remember to configure the HC-05 module with the appropriate settings, such as baud rate and mode. Additionally, you might need to adjust the pin numbers in the SoftwareSerial initialization based on your specific hardware setup.
Please note that this is a basic example, and you should customize it based on your specific requirements and the type of data you want to exchange between the Arduino and the Bluetooth-connected device. If you have specific tasks or functionalities you want to achieve, you can modify the loop() function accordingly.
How to make a HC-05 Bluetooth module?
The HC-05 Bluetooth module is a commercially produced module, and it’s not something you can make from scratch. However, I can guide you on how to use the HC-05 module in your projects.
Steps to Use HC-05 Bluetooth Module:
- Get an HC-05 Module:
- Purchase an HC-05 Bluetooth module from an electronics supplier. These modules are readily available online and in electronics stores.
- Understand HC-05 Pins:
- Familiarize yourself with the pinout of the HC-05 module. The key pins are VCC (power), GND (ground), TX (transmit), RX (receive), and STATE/EN (optional).
- Power Supply:
- Connect the VCC pin to a 5V power source.
- Connect the GND pin to the ground.
- Serial Communication:
- Connect the TX pin of the HC-05 to the RX pin on your microcontroller or USB-to-Serial adapter.
- Connect the RX pin of the HC-05 to the TX pin on your microcontroller or USB-to-Serial adapter.
- Mode Configuration (optional):
- Some HC-05 modules have a key pin that you might need to toggle between AT mode and communication mode. Check the datasheet for details.
- Pair with Bluetooth Device:
- Power on the HC-05 module.
- Put the module into pairing mode. This is usually done by holding the button on the module until the LED starts blinking rapidly.
- On your Bluetooth-enabled device (e.g., Android phone), scan for available devices and pair with the HC-05. The default passcode is often ‘1234’ or ‘0000’.
- AT Commands (optional):
- You can configure the HC-05 using AT commands if needed. Connect the HC-05 to your microcontroller, open a serial terminal, and send AT commands to configure parameters like the Bluetooth name, PIN, etc.
Example AT Commands:
- Change Bluetooth name:plaintextCopy code
AT+NAME=new_name - Change PIN:plaintextCopy code
AT+PIN=1234
Remember that the exact commands and functionality may vary depending on the firmware version of your HC-05 module.
Using these steps, you can effectively use the HC-05 module for wireless communication between your microcontroller (e.g., Arduino) and other devices. Keep in mind that the HC-05 is a module designed for communication and not for manufacturing or building from scratch.
Is HC-05 a Bluetooth module?
Yes, the HC-05 is indeed a Bluetooth module. It is a commonly used Bluetooth module for wireless communication in electronic projects and applications. The HC-05 is designed to facilitate serial communication over Bluetooth and is often employed in projects involving microcontrollers, such as Arduino and Raspberry Pi.
Key features of the HC-05 module include:
- Bluetooth Connectivity: The HC-05 module enables wireless communication between devices using Bluetooth technology. It supports Bluetooth Classic (Bluetooth 2.0 and 2.1) and can be used in serial communication (SPP – Serial Port Profile) mode.
- Serial Communication: The HC-05 module provides a simple and convenient way to establish serial communication between a microcontroller (or other embedded systems) and another device, such as a smartphone, computer, or another microcontroller.
- Versatility: The HC-05 can be configured for different roles, such as Master or Slave, allowing it to connect with various Bluetooth devices.
- AT Commands: The module supports AT commands, which are used for configuration purposes. AT commands allow you to change settings on the HC-05, such as its Bluetooth name, PIN code, and operating mode.
- Ease of Use: The HC-05 is relatively easy to use and has become popular among hobbyists and electronics enthusiasts due to its affordability and simplicity.
It’s important to note that the HC-05 is just one of many Bluetooth modules available in the market, and its counterpart, the HC-06, is another commonly used variant. These modules are widely used in projects ranging from home automation to robotics, enabling wireless communication between devices.
More story in Hindi to read:
Moral stories in Hindi for class